Inspirational Artist Warren Louw!
This is a tutorial on one of the methods I use to colour line art – even though I don’t do that much. It’s a Street Fighter Fan art piece I did quite a while back… I hope you’ll enjoy seeing some sneaks and the process involved in creating it!
I will not explain any drawing techniques or approaches since the main focus is the colouring approach. This is not THE way of colouring line art but just A way of doing it. Don’t get confused with the images – they’re there to help you. Read and understand. I highly recommend a basic idea of Photoshop for this tutorial since it’s a bit for intermediate to advance. I have included in most of my images the Layers window so you can have an idea on how to organise and sort layers.
Pencilling and Inking.
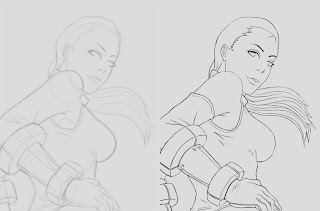
I don’t like to scan and paint on top of my scanned work. I do my digital works from start to finish through Photoshop. So below are two images – one of the loose work (like a pencil drawing) and the other is a refined of the first (like inking pencils). They were done both on separate layers, keeping the loose sketch underneath the polished lines.
Once you have the clean line work on a separate layer, put it on top and set its blending mode to Multiply.
>>Keep in mind to make this layer as clean as possible, so take your time working on it.

Preparing the brush
For this step (especially) use the default round brush with NO pressure sensitivity on Opacity or Flow. You want to make your brushwork strong without fading. Below is an image of how your settings should be.
>>To access to this window you can either go to WINDOW>BRUSHES or simply press F5.

Don’t Panic!
This is an important step that will help up later on. Take your time to understand it. Ok here we go…
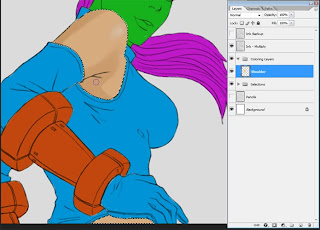
We want to create Group Folders for some specific things in our drawing, for example in this case I created one for the Skin Tones, another for the Clothes, for the Gauntlets etc. For the first Folder “Skin Tones” I did a new layer and decided to name it “Base 1 - Shoulder”. Then I picked up a very strong colour – in this case green. I painted the shoulder on its own so that later on it will not mix with her face. After I created another Group Folder for her Gauntlets and did the same thing, using of course a different colour. Repeat this process while NAMING the layers. You can skip the names if you want, but the more order you have in your layers window, the better the workflow!
>> You have to do your best on not going out of your lines. Its sounds pretty obvious, but be as precise as possible to the contours… we’ll need them in the next stages!
Once you’ve done painting each section and grouping them in Group Folders respectively, we can prepare to move forward. This is how it was for my image. Also note that when I had all the group folders finished, I created another Group Folder to have these sections all together – just like a family! :) Try not to make TOO many of these folders. Just use a folder to separate one thing from the other. Keep things simple!
>> She looks weird huh?! No, she’s not She-Hulk!
Channelling our selections
Ok remember when I told you to keep things simple… here’s why. We have to go to our layers one at a time, and get the selection of the block colour we laid in earlier. It’s very simple to do so breathe if you don’t know! Inhale - exhale!
Click on the first layer, drag your mouse over the layer thumbnail, hold the CTRL button (Cmd for Mac) and click on the layer thumbnail. This will automatically select the border of what we painted in that particular layer. Below is an image of how it looks.
With our selection on, go to SELECT>SAVE SELECTION and a window like the one below will pop up. Name it like the respective layer (or whatever you will feel suitable!). Also make sure that the Channel bar is set to New (by default).
Do this for all the other layers – take your time doing it – no hurry! Remember; load the selection from the layer thumbnail, save selection and bam; go for the next section!
Once you have all the sections saved, you can go to the Channels window which is located next to the Layers window. There you will find that all your selections have their own Channel – which is what we want. Don’t rush and click on them! The fun part will start soon…
Say you want to work with the first part first – being the shoulders. Just similar to what we did earlier, drag your mouse on over the particular channel that has that selection area in it (that’s why it’s good to name them), hold CTRL (Cmd) and click on the thumbnail of that channel layer. Here’s another image for the sake of it:
The Fun Starts...
Having the selection on, go back to your Layers Window and create a new Group Folder to contain the coloured layers. With that selection on you can start painting freely without having to worry about going out. The reason of doing the channels is so we can go back and forth from one section to another whenever we want.
>> The Selection lines moving around and constantly switching on and off are a pain in your ass? Just press CTRL+H (cmd+H) to hide them. Re-press it to get them back visible. That easy!
Here’s how I organised my Layers and started to colour.

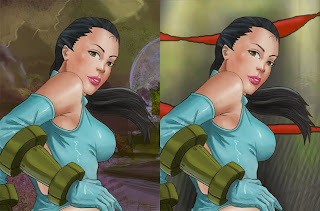
Having our channels help us change the background to the final image whenever we want….Here are the initial background ideas:

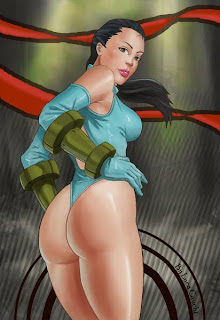
Below is my finished piece which I used this particular process for. I hope you learned something from it. I know it might be a bit complicated, but I did my best on keeping things as simple as possible. If anyone finds some difficulties or questions, feel free to drop it as comment...

Wanna pay me a visit --- go to my blog!
And the inspiration behind the piece - Warren Louw
Peace out.


Aw man sry qisni sparixxejt imma f'daqqa waqu shabi mis-sema u kaxkruni l'hemm.
ReplyDeleteLoving tutorial, I only tried the first part still though; I must find time to go through it all (which will be soon, yes! >_<) but so far so good.
Keep it up Luc.
haha no need for sorries, it's not healthy to be blogging day and night ;)
ReplyDeleteAlso, great tutorial Luca, and let's keep posting all photoshop tutorials under this tag so we get them all in one place
ReplyDeleteDude, I dont want to have to report this, but just credit me for the original artwork of mine (Cammy) that you've mostly copied here, and it will be all cool.
ReplyDeleteThanks =)
Warren Louw
Great stuff Luca. As always.
ReplyDeletegreat stuff buddy.
ReplyDeleteA-T : good, let me know if u encounter any problem.
ReplyDeleteMoira: thanks.
Warren: heyy man! settled! ;)
Graham: Sup buddy! cheers man :)